Free Fire Kalahari Map Guide: Best Drop Zones and Pro Survival Tips in 2026
May 7, 2026
11 min read
Kalahari is the map that exposes every weakness in your game. The open desert terrain, long sightlines, steep cliffs, and confined structures demand a completely different approach from what works on Bermuda or Purgatory. Players who treat it like any other map get eliminated early, consistently.
The players who win on Kalahari are the ones who understand its drop zones, use its verticality as a weapon, and rotate with the terrain instead of against it. This guide covers everything you need: the best and worst places to land, how to rotate from early game to final circle, and the pro-level survival habits that turn Kalahari from a death trap into a Booyah machine.
Kalahari Map Overview: What Makes It Different
Compete on ZP Battle Zone
Apply what you just learned
Join 35,000+ Pakistani players competing in live Free Fire tournaments every week. Verified results, fair play, organized competition.
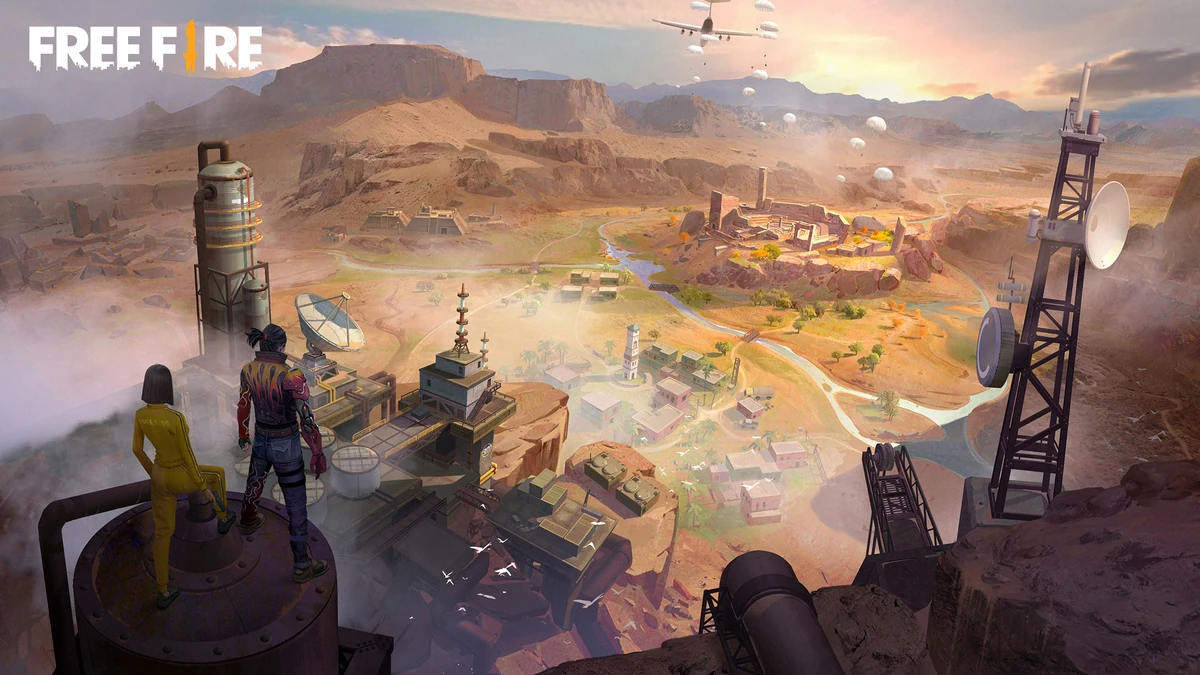
Kalahari is a desert-themed map built around elevation, open spaces, and vertical combat. Unlike Bermuda’s urban layout or Purgatory’s natural cover, Kalahari offers very little vegetation or dense foliage. Most protection comes from cliffs, rock formations, sand ridges, multi-story industrial structures, and canyon walls.
This terrain design means that open ground is genuinely dangerous. A player crossing a flat desert without a plan is visible from multiple elevated angles simultaneously. The map rewards players who use height, move cover to cover, and understand which zones naturally funnel enemies into predictable paths.
Zone control on Kalahari matters more than on most other maps because the safe zone frequently collapses toward elevated landmarks and centrally located structures. Getting to high ground before the zone forces you to is one of the most consistent habits that separates high-ranked Kalahari players from average ones.
Best Drop Zones in Kalahari
Refinery: High Risk, Highest Loot
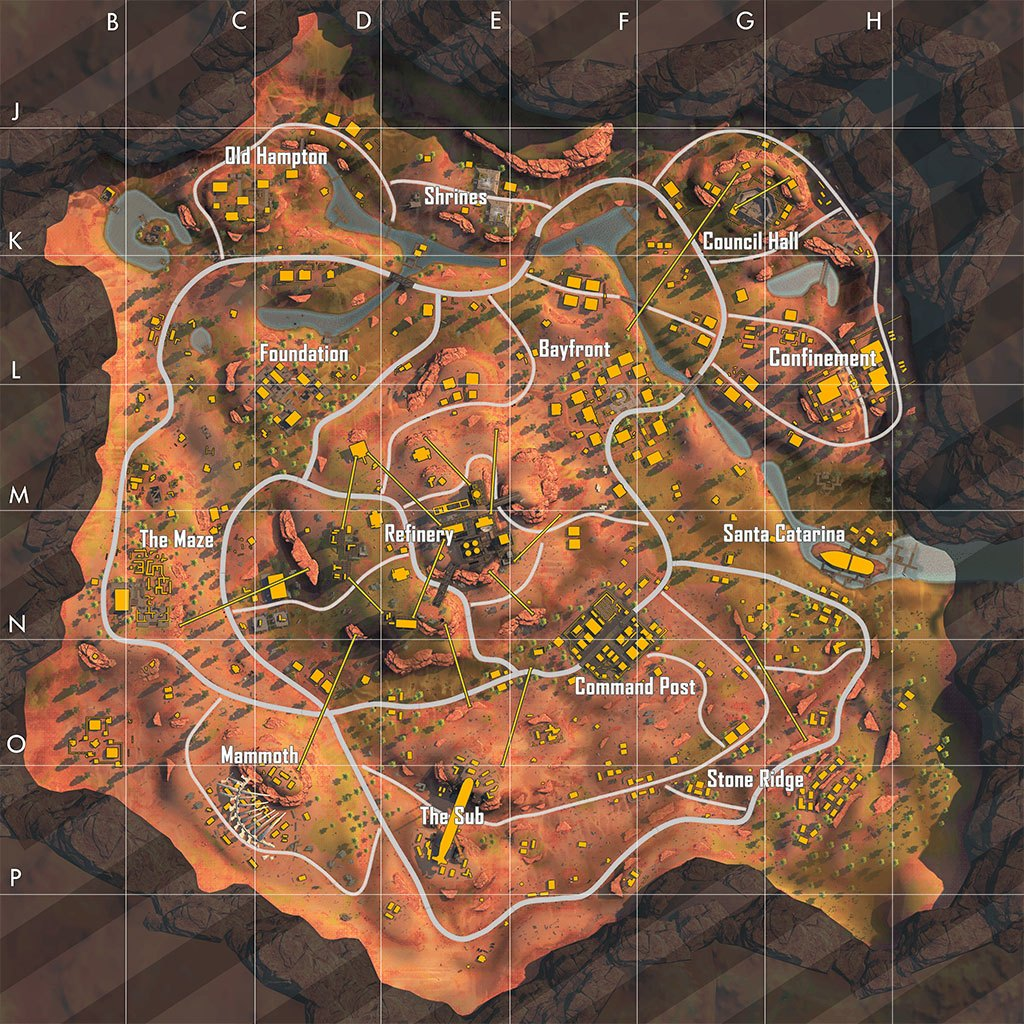
Refinery sits at the center of the map and is the single highest-loot location on Kalahari. It features multiple levels, internal bridges, ladders, and ziplines that make it one of the most vertically complex areas in the game. The loot quality here is consistently top-tier, and the ziplines give you fast rotation options to other parts of the map once you are geared.
The tradeoff is that Refinery draws aggressive squads every match. Expect multi-squad fights within the first sixty seconds of landing. Only drop here if your squad has strong early-game mechanics and can clear a floor quickly before other teams arrive. If you land here and take a straight fight in the open courtyard, you will likely be caught in a crossfire from teams above and below you simultaneously.
The smart approach at Refinery is to land on an upper level, secure your immediate floor, and use the vertical layout to force fights on your terms rather than letting ground-level squads dictate the engagement. Use the ziplines to exit toward whichever side the zone is pulling once you are looted.
Command Post: Complex Interiors, Great Close-Quarters Play
Command Post is the zone of choice for players who want strong loot with better structural cover than Refinery provides. It features tight corridors, multiple rooms across several floors, and corner angles that heavily favor defenders and players who know the layout. Snipers also benefit from the elevated outer positions that overlook the surrounding terrain.
When dropping Command Post, land on the outer edges of the complex rather than the central courtyard. Coming in from a side entrance gives you time to grab an initial weapon before being exposed to the whole lobby. From Command Post, your early rotation options are strong in most zone scenarios due to its positioning on the map.
Bayfront: Lower Traffic, Reliable Loot
Bayfront is the right choice when you want to avoid the chaos of the Refinery and Command Post but still leave the drop zone well-equipped. It is a large area built over multiple structures with a solid loot spread across its buildings. The traffic here is noticeably lower than the central hotdrops, which means you typically have time to loot without an immediate fight forcing your hand.
Bayfront also has quick access to elevated terrain nearby, which makes early high-ground control achievable without a long rotation. For players grinding ranked points consistently, this zone gives you the gear you need and the survival buffer that makes a difference in final placement.
Confinement, Council Hall, and Other Zones
Confinement is an enclosed area that rewards players comfortable with shotguns and SMGs. Its walled structure and narrow pathways make it excellent for close-quarters combat and for players who want to fight on their own terms without dealing with long-range sniping. It sits in a position that tends to be slightly off the main zone collapse path, so loot is consistent without being a constant hotdrop.
Council Hall features spacious buildings and flexible rotation paths, making it one of the best zones for squads that want to control space and set up a defensive position before moving. It is particularly useful as a mid-game hold when the safe zone pulls toward the center of the map, and you need a defensible compound to anchor your team before the final circles.
When and Where NOT to Drop on Kalahari
Dropping directly into the center of any major hotdrop on a flight path that passes straight over it is one of the fastest ways to end a match before it properly begins. Refinery on a central flight path will have four to six squads landing simultaneously. Unless your squad specifically practices and thrives in those conditions, you are gambling your ranked points on a coin flip.
The smarter approach is what experienced players call the safe-lane drop. Instead of landing at the center of a popular zone, land at its outer edge or at a smaller structure just adjacent to it. You still access the same rotation paths and often pick up loot from buildings other squads skipped in their rush to the main compound. By the time the hotdrop chaos resolves, you are already geared and positioned to push the winner.
Rotation Rules on Kalahari
Early Game: Getting Out of the Drop Zone Safely
The first priority after looting your drop zone is reading the first safe zone and beginning your rotation before the zone timer becomes a threat. On Kalahari, the mistake most players make is waiting too long at their drop zone because fights are still happening nearby. You do not need to win every early fight. Getting to a good position inside the zone with your health intact is worth more than the kills you sacrifice by rotating early.
Use canyons, ridgelines, and low-profile structures rather than crossing open sand. Kalahari’s terrain gives you natural corridors that keep you mostly hidden during early rotation. Moving through these covered paths rather than the flat center drastically reduces your exposure to snipers and third-party squads setting up on high ground.
Mid Game: Zone Edge and Natural Cover
The mid-game on Kalahari is where most squads get caught in the open and eliminated. The safe zone shrinks toward a landmark or elevated area, and players who took the obvious center routes are now exposed on flat terrain with multiple teams converging from different angles.
Rotating along the edge of the safe zone using cliffs, rock walls, and the map’s natural ridge lines is significantly safer than driving through the center. Moving along one side of the zone means you only have to manage threats from one direction. The terrain on Kalahari’s perimeter consistently provides better cover than the open desert between major drop zones.
Late Game: High Ground vs Underground Play
In the final circles, Kalahari gives you two fundamentally different survival options. High ground on a cliff or elevated structure gives you vision over the entire remaining play area, lets you pick shots from safety, and forces enemies to push uphill into your sightlines. This is the higher-reward option when you have the right loadout and enough healing items to sustain a defensive position.
Playing low in pipes, tunnel structures, or behind crater formations is the counter-strategy. When multiple squads are contesting high ground, being at ground level in a hard-to-see position lets you wait for those fights to resolve before engaging the weakened winners. It requires more patience, but it is extremely effective when you lack a long-range weapon or are low on healing.
Pro Survival Tips for Kalahari
Use Verticality as a Weapon
Every fight on Kalahari that you can take from above is a fight you start with an advantage. Projectiles travel downhill more predictably, enemies are easier to spot against the sand below, and your cover position is harder to flank from ground level. When you identify a potential fight, ask yourself if you can reach higher ground before engaging rather than taking the fight from wherever you happen to be standing.
Characters with mobility skills that support vertical movement or reposition under fire are particularly effective on Kalahari. Abilities that boost movement speed or provide burst mobility when climbing toward an elevated position help you reach and hold high ground before opponents can contest it.
Master the Peek and Hide Mentality
Kalahari punishes players who hold one position and keep shooting from it. The open terrain means enemies have time to flank you or call their squad to push you simultaneously once your position is known. The most effective habit is to peek from a rock or cliff edge, fire, and immediately reset behind cover before the return fire arrives.
Practice this in custom rooms. Find a cliff edge or building corner and drill peek-shoot-reset cycles until the movement becomes automatic. On Kalahari, the player who spends the least time visible while dealing the most damage wins every fight it is possible to win.
Use Vehicles and Gliders Intelligently
Vehicles are extremely useful on Kalahari for covering the long distances between drop zones and the shrinking safe zone. The map’s straight canyon paths and flat desert roads allow fast vehicle travel that would take several minutes on foot. The risk is noise and visibility. A moving vehicle announces your position to every squad in the vicinity.
Use vehicles for rapid mid-game rotation across safe, low-traffic paths, then park and dismount before you reach any area where enemies are likely positioned. Gliders extend your reach during drops and can give you surprise flanking angles that ground-level opponents do not expect. A well-timed glider approach to a ridgeline above an occupied compound is one of the most effective plays on this map.
Looting Tips for Kalahari
Your loot priority on Kalahari should be shaped by the map’s combat reality. A helmet and vest are your first priority because open engagements happen fast, and headshots from elevated snipers are extremely common. A mid-range to long-range weapon should come before a close-range one, given that most engagements begin at a distance before closing into buildings.
Grenades are significantly more valuable on Kalahari than on other maps. The open terrain means enemies regularly set up behind rock formations where direct shots are difficult. A well-thrown grenade displaces them and forces a repositioning that opens up a direct angle. Carry at least two grenades heading into the mid-game and replenish them whenever you find them during looting.
Healing items need to be stocked beyond the typical minimum. Kalahari’s open rotations and frequent zone damage mean you will spend more healing items per match than you would on Bermuda. Leaving a compound without at least five healing items of any type is a habit that gets you eliminated in the final circles when you have no resources to recover from a long rotation.
Quick Checklist: Kalahari Match Preparation
Before every match on Kalahari, run through this:
▸Pick a landing zone that matches your playstyle, not just the highest loot.
▸Plan your first rotation path before you jump from the plane.
▸Prioritize the helmet, vest, and a mid-range weapon as your first loot targets.
▸Use canyons and ridges for all rotations; never cross open flat ground without cover.
▸Secure or identify the nearest high-ground position relative to your drop zone.
▸Carry grenades and stack healing items above minimum before entering mid-game.
▸Review the zone direction and start moving before the timer becomes a threat.
Kalahari is the map that rewards preparation over instinct. Every decision from your drop to your final-circle position compounds across the match. The squads that win here consistently are not the ones with the best aim. They are the ones who control height, move with the terrain, and never give the map an opportunity to work against them.
Stop losing to the map. Start using it.
Every Booyah on Kalahari starts with the right knowledge. Explore our full guides on Kalahari rotation paths, the best characters for vertical and long-range play, and pro sensitivity settings built specifically for desert-map engagements. Your next Booyah is one guide away.